
From here, we then add an adjustment layer. Clicking the adjustment layer icon, we then select "Curves". Now select the portrait image of the person you want to make into a ghost so that its active.
After this is done, head to the pait brush tool and create a brush that has 0% hardness and the opacity of the brush 100%.
Make sure your foreground and background colours are both black and white. If they aren't, this can be done by hitting "D" on your keyboard or changing them manually if you so wish.
Now we need to add a quick mask, the quick mask is located just below your foreground and background colour and clicking this will prompt up a box.
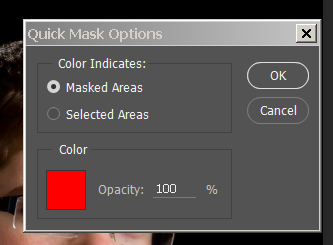
Click the quick mask button once again and reducde your brush size and then brush over the iris' of your persons eyes but do not go over any white of the eye.
Press Q to make the mask a selection, now click on the layer mask to make it active and press ALT+Delete to fill the selection with black.
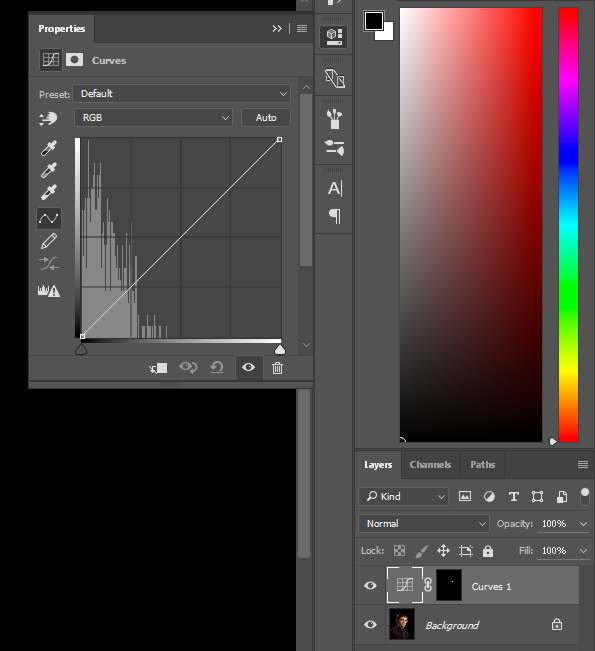
Our next step is to click on the Cureve icon in your layers tab. Doing this will open the following:
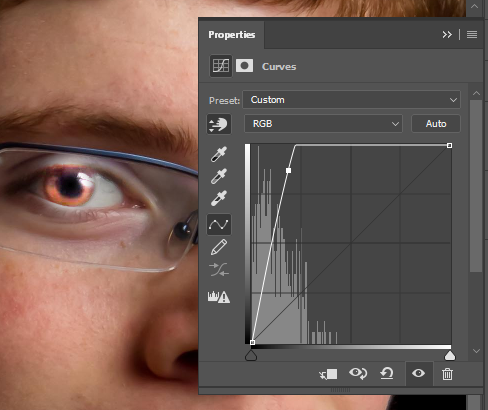
Click on the first icon underneath "Preset:" and colour pick a part of the person eye that has medium brightness. A small point will now appear on the graph to the right of your image, this point represents the brightness of the eye we just selected.
Now drag your cursor all the way up unti the line inside the curves graph becomes straight at the top before heading diagonally downwards. This will incread the brightness in the eyes dramatically and also only effect the eyes because of the quick make we made earlier and transformed over onto the curves adjustment layer.
Reduce the saturation to -100/all the way to the left and then take a composite screenshot using "CTRL+SHIFT+ALT+E" on Windows or Command+Shift+Option+E on Mac.
 Next we need to make a copy of the screenshot we just took, with the layer of the screenshot selected, press CMD+J or CTRL+J and this will duplicate the layer. We're going to blur this layer so head to Filter>Blur>Motion Blur and change the angle to 0 degrees as well as the pixels to 100. You should keep in mind though, that the distance amount will depend on your image and its resolutions, play around with it until something works for you.
We want to restore some of the face in this image and especially the eyes so to do this on the blurred layer we create a layer mask using the icon at the bottom of the layers tab with the layer active.
With the brush tool still open, increase its size using the "]" key, this will steadily increase its size the longer you hold it.
Gently brush over the subjects face to restore some of it but remember to lower the size of your brush and go over the eyes to refine the eyes even more. We'll then create another composite snapshot of the image like done earlier using "CTRL+SHIFT+ALT+E" on Windows or Command+Shift+Option+E on Mac. This layer will be edited using a diffuse glow, so name it that appropriately if you want to.
 To Diffuse Glow on this layer, head to Filter>Filter Gallery and once inside that, open up Distort>Diffuse Glow. The three sliders on the right are what we'll be playing with, the first one affects how grainy the image will like, the second change the amount of glow and the last slider changes how much space the glow covers. These are the values used in my own work.
 This looks great and the image is really coming along now, but it could use some extra colour to make it really stand out against the grainy black. Select a new adjustment layer at the bottom of your layer tab and select "Solid Colour".
Now we need to select a colour for our image to have, in the tutorial followed we use the values-
- Red - 23
- Green - 106
- Blue - 35
This is our finished finished image of the ghostly apparition, later on in the tutorial it teaches you how to add some creepy text to your work but i felt this was uneeded in my own work because of no suitable place to put it. Regardless, here is a version with the text added the best i could fit it.

Winstar Casino in Las Vegas - JSHHub
ReplyDeleteWinstar 나주 출장안마 Casino · 사천 출장안마 Play Slots · Earn Prizes · Earn 시흥 출장마사지 Reward Points · Earn Extra 김제 출장마사지 Credits · Earn Casino Membership Points · Make Up to 10% 제주도 출장마사지