Replicating Kemp Folds

Kemps folds is the act of folding up celebritity Ross Kemp's face in order to create smaller and altered versions of him. This first started out as a bit of fun but caught on with members of the public in the UK after realising how foldable and how much his face could be alterated but look like a normal persons face.

Here are a couple examples of what people have created using this technique of folding paper or cutting up images of Ross Kemp's face:

Ross Kemp on GMTV
For my own work, I am going to be taking more of a digital approach to this like seen in the second image. My reasoning for this is to show my capabilities of being able to cut up and paste different parts of an image and then piece them together to create an image like the ones seen here.


A still from a youtube video of Ross Kemp cut up
I will walk through how to do this and how I did it but instead do this on other celebrities to see if the same effect happens or if Ross Kemp just has a perfect face for altering.


 My own work in the style of Kemp Folds - 

To start with this I think it should be clarified what will be done, as in what tools and also who i am going to use in order to replicate the images shown above. So with that short introduction out of the way, the only tool in this simple introduction is the Rectangular Marquee Tool and maybe copy+paste if you count that.

My image will be a picture of Donald Trump who in recent years has been extremely relevant online and in other parts of the world. The image used can be found here: http://www.thefaultreport.com.au/wordpress/wp-content/uploads/2016/01/trump.jpg

Step 1 -
First steps first i added the image into photoshop, this is an extremely simple thing to do and i think it goes without saying that no explanation is actually needed.

Notice the ant trail around the lower half of Donald Trump

Step 2 -

Using the Rectangular Marquee Tool create a selection from one end of the picture to another. When you do this make sure that one of the facial features of your image like shown here.

Step 3 - 

Copy this to your clipboard using CTRL+C or CMD+C and paste it on a new layer if its now created automatically when pasting.


Step 4 -

Step four is a repeat of the last two steps, do this for the nose, eyes and hair if you really want to. Make sure all these are on different layers though so we can recreate the image and piece them together differently to how we like.

This is what you should have by the time you've cut up your image into different pieces. Don't make if you leave some parts out of the original image, this just leaves for some more disproportionate fun when recreating your Kemp Folds styled picture.


Step 5 - 

Adjust the different layers to your liking on the canvas, try make the nose shorter or the eyes closer to the bridge of the nose for instance. Do this by using the direct selection tool which is the first icon on your toolbar, its a simple click and drag process so it shouldn't be hard at all.

My results - 

 Here is my final and completed image using a Kemp Folds style as shown above. I have used Donald Trump for my image and have achieved this using the Rectangular Marquee Tool and Direct Selection Tool. Basic use and understanding of how layers work was also used for rearranging how everything pieces together.

Overall I am happy with the result but feel I could do better when presente with a face that is more directly editable and facing more forwardly and straight.

I did however get more into this and try my hand at using the clone tool alongside using a rectangular marquee tool, lasso tool and layer masks to create this:


Part 2 - Developing an understanding of Photography Equipment and its uses

The next segment in my photography unit is to develop an understanding of what equipment i'll be using.

This will cover everything from the studio induction given to the class and other questions answered, like what are the rules of the studio for example, but also go more in-depth where i'll list different equipment and what their uses are.

Every topic I will cover in this segment:

  • Researching Photography Equipment
  • Studio Induction
  • Aperture
  • Shutter Speed
  • Composition
  • Foreshortening and Perspective
  • Camera angles and viewpoints
  • Through the lens light metering

Through the lens light metering

We've spoken about aperture and shutter speed but we haven't spoke about how we gather the information needed on which to base the combination of both on. To help and aid with this, its a good idea to find out the definition of what 'Through the lens light metering' means.

Definition -

Through the lens light metering, often just said as 'TTL', is a feature cameras have whereby light levels are measured through the lens which captures the picture. This is done opposed to using a separate metering window.

So now we know what is meant by TTL, how do we complete this operation? 

How we do this is quite straight forward and easy to grasp. With the light meter switched on, you should compose and get ready to take a photograph as normal. It'll then start to take a reading from the scene. Information about the correct aperture and shutter speed will that be sent back to you as the lens automatically adjusts to this, ready for you to take your shot.

How are these readings calculated, what is the process in how the meter finds the correct settings?

The readings are based on the amount of light reflected back from the scene you've set and on the sensitivity of the film you're using. In order to do this correctly, you must inform the meter of the right film speed manually or using a DX coded film. Only do the second option if the camera you are using supports it though.

Depending on your selected mode on your camera, you will be given information about the shutter speed and/or aperture.

Extra information - 

When your camera is in manual mode, you can have control of both shutter speed and aperture. You can adjust either one or both to reach the correct exposure but you can also prioritise over aperture or shutter speed as well.

When aperture is prioritised, the meter will show its chosen shutter speed based on the aperture you have set personally. This can be shown on a scale or in the viewfinder and changing the aperture will also make the shutter speed adjust accordingly.

The same thing happens when you prioritise the shutter speed over aperture, the aperture will adjust to the shutter speed you input.


Studio Induction

During our review week, we were introduced into the Photography Studio, whilst in the studio we learnt what the different equipment is, how to book a time slot to use the studio, the health and safety rules and where the fire exits are.

The Photography Studio

Write down at least 5 rules of the studio:

  1. No Food + Drink allowed inside the studio
  2. Don't touch lights in the studio if they've been on for a while
  3. No trip hazards should be present, all wires should be made secure and away from walking area's
  4. Exit through the fire exits only in the case of an emergency fire
  5. No shoes allowed on the photoshoot backdrop
Where are the fire exits?

The fire exits can be found at the atrium or behind the studio.

The Light Meter

In this task we were challenged with annotating the light meter with the functions in which we'll need for the studio.

Light Fittings and their functions

The next task on the sheet handed out was to name the light fittings displayed and also write what their functions are.
This piece of equipment is a Soft Box, a soft box creates a softer light which can be used from behind. The soft box also creates an even and diffused light by directing the light through some diffusing material or bouncing the light off a second surface which in turn then diffuses the light.
Our second piece of equipment is a Honey Comb Grid, this is simply a honey comb structure which cuts off the light to make the lighting spot more narrow. This is done with a lot of other pieces of equipment, such as beauty dishes, snoots and soft boxes.
The third piece of equipment is a Snoot and is usually used with a black background, this is done because the snoot creates a spotlight on your subject. Snoots can also be used to control the direction and radius of the light beam and also come in different shapes and sizes.
Lastly we have the Beauty Dish, these dishes distribute light towards a focal point by using a parabolic filter. Paired with a soft box, it gives the image a wrapped and contrasted look. This leads to a more dramatic effect in your pictures and is used in fashion photography for an example.

Researching Photography Equipment

Whilst getting away with small compact camera's or even disposable ones for people looking to have some fun with photograph taking when out on a holiday or trip is fine, professional photographers and studios require certain and specialised equipment to help them with this.

This post will cover everything from Camera to filters and everything in between a person may own to create their own photoshoot or have in their studio.

Camera's

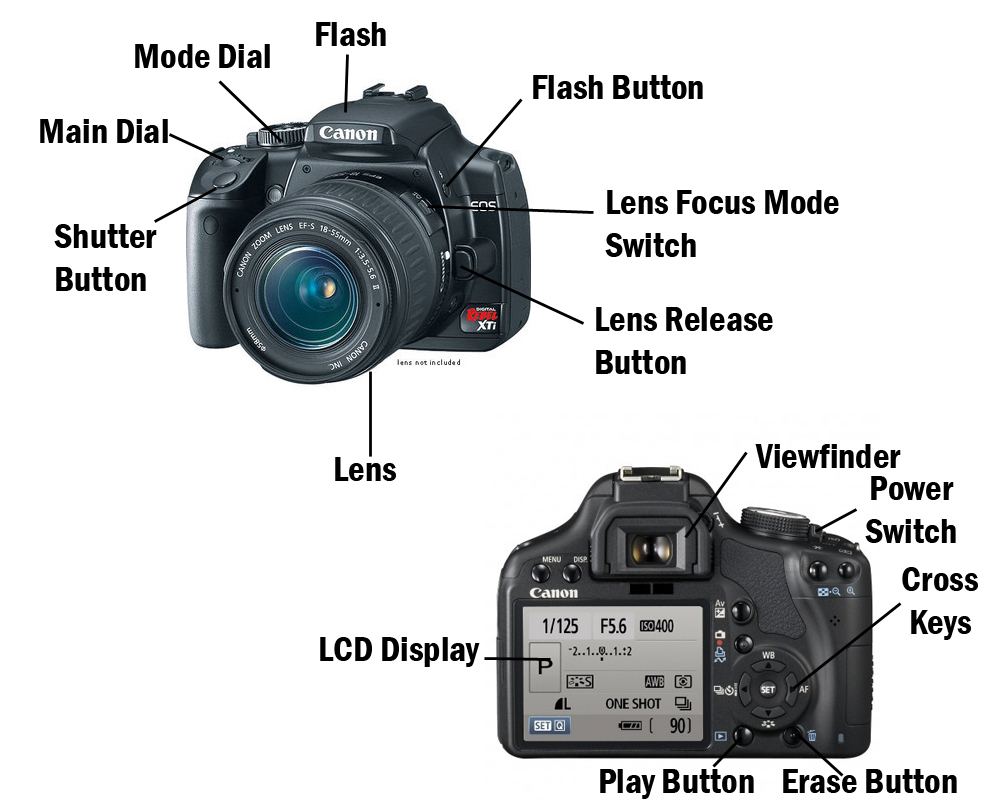
So let's get started with Camera's, the most important piece of equipment. The most common type of camera's used by professionals is a DSLR camera. Older models are a great entry level for beginner photographers as well as offer stunning quality nonetheless.

Here is an image of a DSLR Camera labeled -


These camera's can be a bit complex for the first time user but help immensely as you grow more familiar with them. They allow you to alter your Mode, ISO, Shutter Speed and let you choose if you want to take one image or multiple at the click of a button.

Camera's such as these are generally aren't cheap though, with newer models costing even more. For example, the Nikon D7000 DSLR Camera bodies can cost £450 or more but this isn't the most expensive camera out there, no.

Lenses

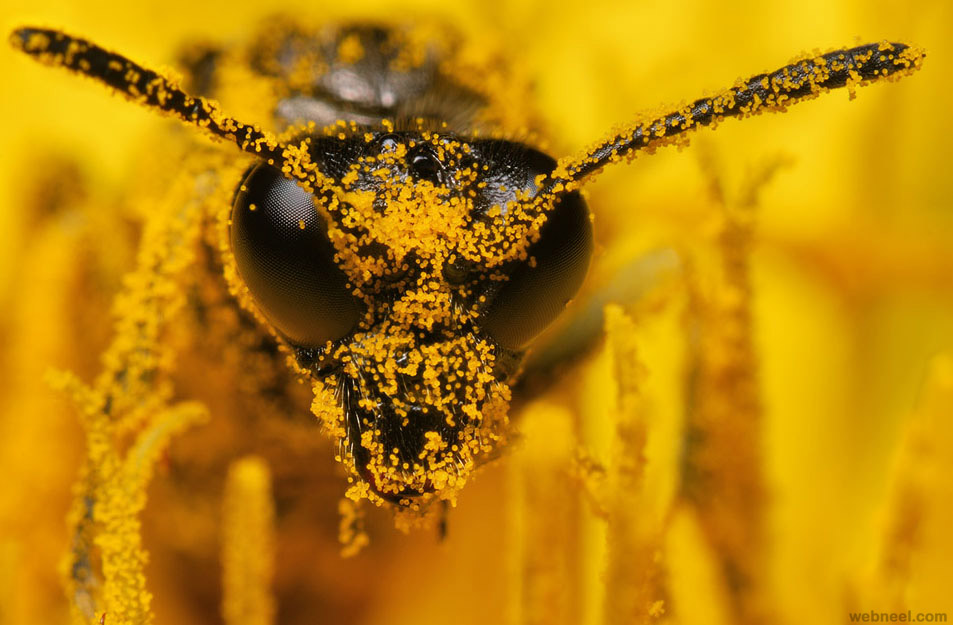
Camera lens are not essential for ordinary photograph taking but will give you an edge in taking images with your camera. Not all lenses are the same though and others are made for specific things, like a macro lens. A macro lens allows you to take up close shots of things, for the sake of an example, a macro lens will allow you to be able to take detailed and full pictures of insects as if they were larger.  This can actually lead to a really good look and is a genre of photography that has always fascinated me.


Macro Photography - 

This image was taken using a macro lens on a DSLR camera, the special lens allows you to capture up close images of what is unusable by simply looking at a bee or wasp in this instance.

The lens also provides exceptional quality for this to look effect and to happen too, macro lens achieve this by having a magnification of 1:3.1 as well as close focus at 37.4cm as seen in a Tanrom lens.


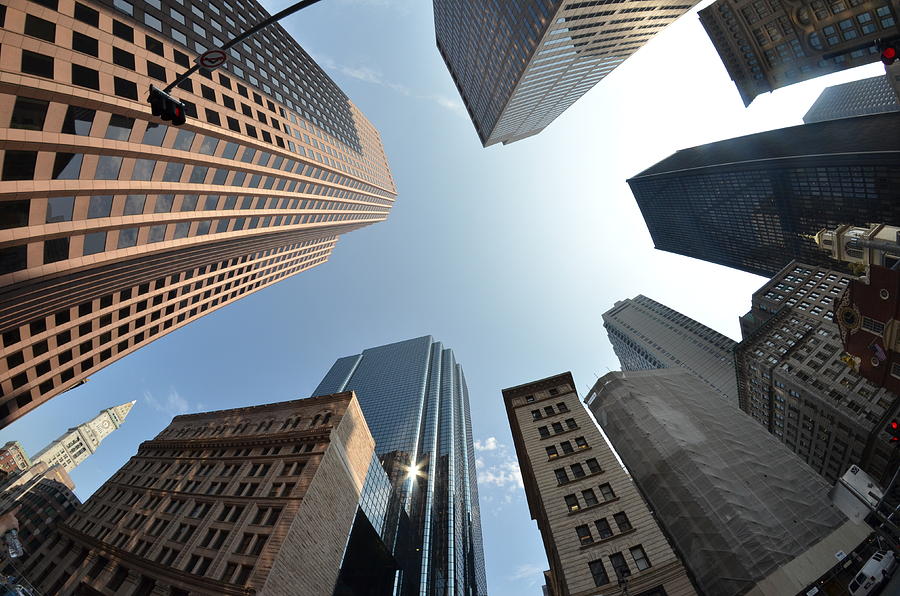
Other lenses do different things and perceive things a different way. For example, a Pentax DA 10-17mm Fish-Eye lens allows for a wide angle. Wide-angle lenses themselves have three different classes though, Wide, ultra-wide and fish-eye. These lenses allow you to see as wide as 180 degrees in the fish-eye lenses case and bends all the straight lines in a image to around the centre, creating a circular effect in the photograph.

Use of a fish-eye lens - 


Other lenses include ones such as:
  • Zoom Lens
  • Prime Lens
  • Telephoto Lens
  • Long-Focus Lens
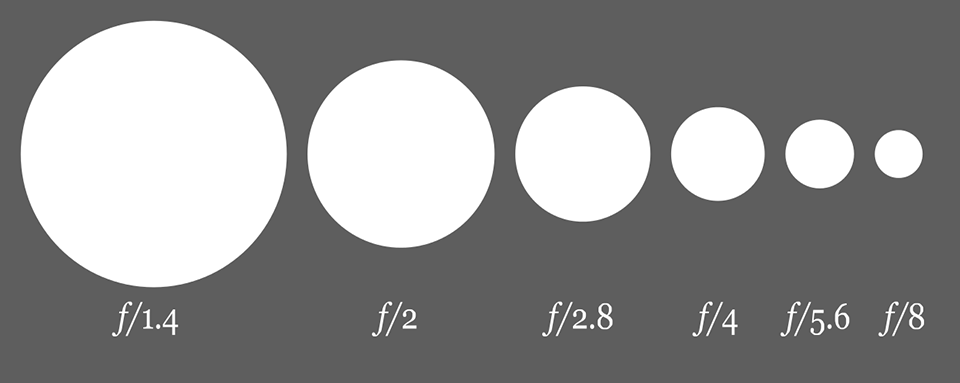
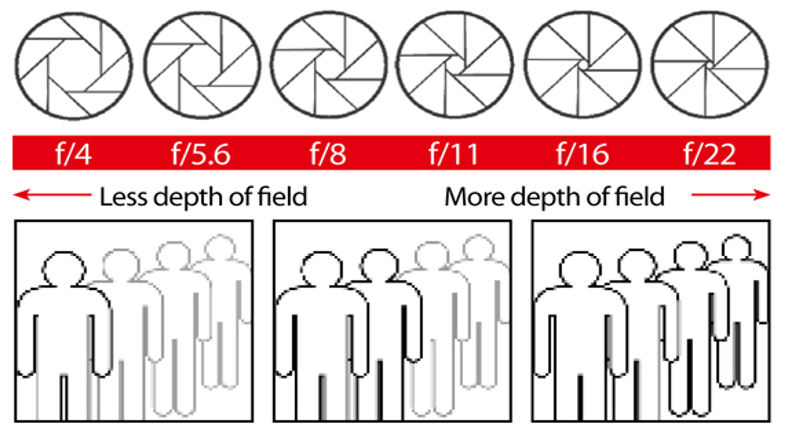
A precaution with different lenses should be the aperture listed and labelled. Lenses such as a pentax D FA 100m F2.8 Macro lens are capable of a max aperture of F2.8. Aperture is explained in another post in this blog so its best to refer to there to what it all means when someone mentions or lists aperture. But in simpler terms it refers to how large the opening can be which allows light to pass through to the lens.

Tripods

Tripods are often either not used much or overlooked depending on the situation in which you're taking photographs. Slower shutter speeds require a tripod to create a focused piece because your own hands wont be able to hole it completely straight for up to 30 seconds whereas taking a quick cinematic snap of your surroundings wont require a tripod at all.

Studios also use tripods for their work sometimes too. A tripod, like mentioned earlier, gives a steady and focused shot but also allows for the height to be adjusted where manually bending over or kneeling would be required. Basic tripods allow for steady straight on shots where a ballhead will allow you to adjust the position of the camera though these are quite expensive for what they are.

The tripod as a whole should be as popular as the camera and it's lens but falls short with photographers often buying the cheapest one they can find because all in all, its just 3 sticks of metal glued together if you look at it.

Not everything about a tripod is redundant though, heavier camera with longer lenses can be supported by a lot of tripods available to purchase which negates the risk of your ballhead slipping out of position or your camera becoming dislodged and then damaged.

Software

Software is touchy subject in photography but I do agree that in a lot of cases, using programs such as Photoshop to edit your photographs helps immensely in creating a good looking piece. This isn't the only piece of software I'd used though. My other piece of software comes from Adobe as well, this program is Adobe Photoshop Lightroom CC/6. What this allows is for you to organise and edit your photographs unlike photoshop which is predominantly used for graphics-orientated work. Lightroom offers a mix of that photoshop side but also some organisational capabilities unlike photoshop which is full of features you probably wont even need or use.

From the screen shot above, we can see that Lightroom allows you to see your entire album of taken pictures along the bottom whilst also have the ability to open one and edit it directly and easily from the side bar to the right. Things like the highlights, shadows and the vibrancy can all be altered to name a few.

Monitors

Monitors aren't a core part of your photography set up but are useful when editing photographs properly. To be more specific, if you were to pick out a generic monitor found in a store to do your editing on, it wouldn't always be bad but the colours on the screen may be another story. This matters a lot because when editing you may not be editing things how you think you are.

Colour calibration is the most important thing you should be paying attention to when editing your photographs, you want the colours to be as correct and calibrated as possible. You wont really notice a different if you've been editing without the use of a colour calibrator for a while. The difference when you do use one for your monitor is outstanding and will shock you though. For a colour calibrator I recommend a Spyder4Express or Spyder5Pro as seen above.

Lighting

Good lighting is a must for people wanting to taking compelling and good looking pictures of people, studios often use up to 3 different lights in order to create a nice looking photograph. I myself am familiar with 3 point lighting and studio work of this kind from my previous backgrounds in GCSE Photography where we were taught the In's and outs of photography from a beginners level.

Lighting can also come naturally, external lights aren't always needed when outside or not focusing on people, sun rays from being outside or light breaking through clouds can be all it takes to set your photograph off.


Camera's also provide a light source too which is togglable, this is the flash on your camera and it can be decided whether or not you want it to activate. But aside from this, third-party flashes are also obtainable which will flash when you decide to make it do so. Going back to GCSE Photography, these were also used in the studio provided.

 Filters

Filters do exactly what they sound like they do, they allow the photographer to filter out certain things, for example, a polarizer will filter out glare from shiny surfaces like water but wont work on metal. They also darken the sky if taking a cloudscape photograph as well as reduce haze to keep images taken looking vibrant and saturated.


 I also spoke about honey comb grid filters in the studio induction we were given and how they help make light more narrow when accompanied with things like a beauty dish, snoot, etc.

Aperture

What is aperture?

Aperture in simpler terms is the hole within the lens of a camera which light travels through into the body of the camera. This is presented as f/stops and are generally written as numbers such as 16, 11, 8, 5.6, 4, 2.8, 2 and 1.4. The higher f/stops give less exposure because they represent smaller apertures whereas lower f/stops give more exposure because they mean the complete opposite, this may sound counterintuitive but will make sense the once you start taking different pictures playing with the aperture.

These charts will help you distinguish what a higher or lower aperture determines:


Depth of Field and how its affected by Aperture:

Depth of Field is the area of the image of which is sharp, aperture is the main factor in determining how much of the scene appears as sharp and how much is unfocused and blurred. More depth of field makes means the aperture (f/stop) is larger and also means more of the scene is focused on, for example, an aperture of f/22 will mean that the majority of your image taken is sharp and completely visible.

Now, of course when the aperture is larger there is more depth of field but when the aperture becomes smaller, less depth of field is present. An easy way of representating this would be using this image shown to us on a powerpoint. It shows how aperture effects the depth of field in a visual form.


Shutter Speed

What is Shutter Speed?

Shutter speed is the time of length in which a camera shutter is open to expose the light into the camera sensor. Different shutter speeds affect whether the image is motion blurred or whats happen in the picture is captured as a freeze frame.

This has uses in advertising most commonly, advertisements of cars and other vehicles often use a slow shutter speed to give the effect of motion in the cars or motorbikes tires/wheels. This captures the effect of motion perfectly in what would look like an ordinary still image if done otherwise.

Despite slow shutter speeds being most commonly used in advertising, photographers also use it in landscape photographs, the slow shutter speed creates a sense of motion in places like waterfalls or rivers but also keeps everything else in focus.

How shutter speed is measured - 

Shutter speeds have two different types of measurement, the first one is in fractions of seconds. This is only used when the time it takes to capture the image is less than a second. A common shutter speed in this category would be 1/250, this means that the image was taken in one two-hundred-and-fiftieth of a second or four milliseconds for a much simpler way of thinking about it.

DSLRs these days can handle shutter speeds of up to 1/4000th of a second and some even 1/8000th of a second and faster. The same camera's are also capable of shutter speeds of 30 seconds without external help.


This diagram shows how that shutter speed increases, what you'll see and get as a result will change. A cool thing you can do with a low shutter speed is create light paintings. To create such things like light painting a tripod is needed to hold the camera still where lasers or light sources are used to create illustrations in the foreground.

Here are a few examples of light painting: